Get Started with Galaxy
Overview of the Galaxy platform
FROGS is hosted on the Galaxy platform, an open-source web environment designed to make bioinformatics analysis accessible, transparent, and reproducible. Originally developed at Penn State University, Johns Hopkins University, Oregon Health & Science University, and the Cleveland Clinic, Galaxy has grown thanks to substantial contributions from an active international community.
As a web-based platform, Galaxy allows users to perform complex analyses without installing any software or writing code. Its versatile workflows make it easy to combine and reproduce tools for different sequencing projects.
As a web-based platform, Galaxy allows users to perform complex analyses without installing any software or writing code. Its versatile workflows make it easy to combine and reproduce tools for different sequencing projects.
- Accessibility: Users with no programming experience can easily upload or retrieve data, run workflows like FROGS, and visualize results directly in their browser.
- Reproducibility: Galaxy automatically records all parameters and inputs, so any analysis can be fully understood, reviewed, or repeated by others.
- Transparency: Users can share or publish their entire analyses — including histories, workflows, and visualizations — or even create Galaxy “Pages” to document methods for publications.
Accessing the platform
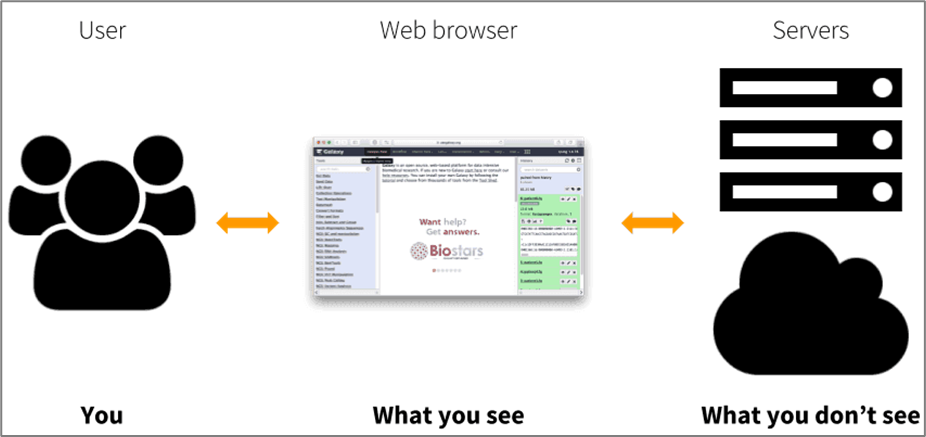
When using FROGS on the Galaxy platform, nothing runs on your own computer.
All computations are executed on remote servers, so your computer is only used to access the web interface.
This means you can run large analyses without worrying about your computer’s power or operating system — you only need a web browser and an internet connection.
FROGS is available on multiple Galaxy platforms, making it easily accessible to users from different institutions and research domains.
In particular, FROGS is hosted on three main partner platforms:
⚠️ Important
Each Galaxy platform operates independently. FROGS is available on several Galaxy instances but these platforms are not connected to each other.
This means that:
All computations are executed on remote servers, so your computer is only used to access the web interface.
This means you can run large analyses without worrying about your computer’s power or operating system — you only need a web browser and an internet connection.
Reference: https://galaxyproject.org
FROGS is available on multiple Galaxy platforms, making it easily accessible to users from different institutions and research domains.
In particular, FROGS is hosted on three main partner platforms:
- Genotoul Bioinfo/Sigenae (INRAE Toulouse) https://vm-galaxy-prod.toulouse.inrae.fr
- Migale (INRAE Jouy-en-Josas) galaxy.migale.inra.fr
- IFB Core (French Bioinformatics Institute) https://metabarcoding.usegalaxy.fr
⚠️ Important
Each Galaxy platform operates independently. FROGS is available on several Galaxy instances but these platforms are not connected to each other.
This means that:
- Your data are stored only on the platform you are using and are not shared with other Galaxy servers.
- Tools and workflows may differ slightly between platforms; some tools available on one FROGS Galaxy instance may not exist elsewhere.
- Each instance relies on its own computing cluster, so job performance and storage capacity can vary from one platform to another.
The Galaxy Interface Layout
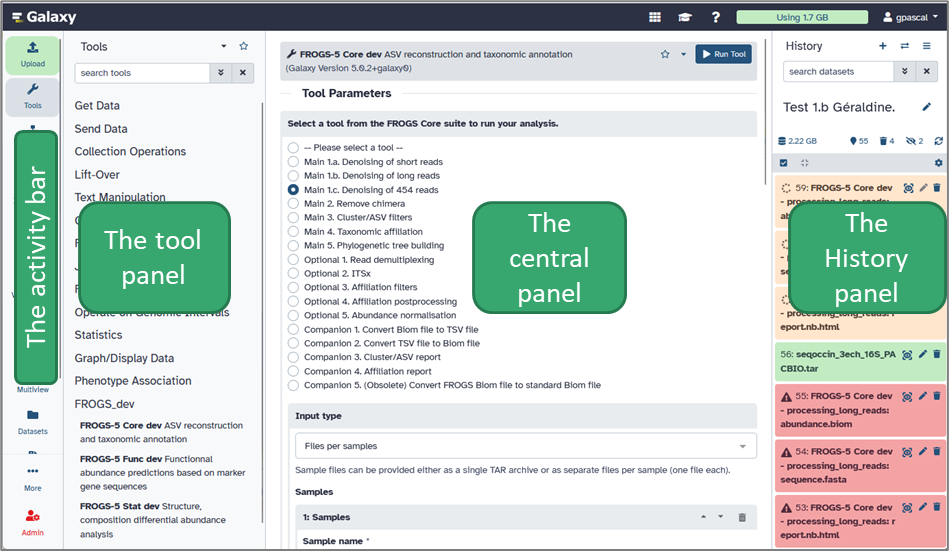
The Galaxy web interface is divided into four main panels, each with a distinct role.
Understanding how these panels interact will help you navigate the platform efficiently.
Tip: Use the search bar at the top of the Tools panel to quickly find any tool by name or keyword.
 Grey = waiting for server response
 Orange = running
 Green = finished successfully
 Red = failed

Histories are automatically saved and can be renamed, shared, duplicated, or downloaded.
Tip: You can click on a dataset name to view details or click the eye icon to preview its content.
Understanding how these panels interact will help you navigate the platform efficiently.
a. The Activity Bar
The activity bar enhances the user experience by providing quick access to essential Galaxy features: you can upload files, open tools and workflows, or switch between your histories and ongoing analyses.b. The Tools Panel
This panel lists all the available tools on your Galaxy platform. Tools are organized into categories (for example: FASTQ Quality Control, FROGS-5 Core, Qiime, etc.). When you click on a tool’s name, its description and parameter options appear in the central panel.Tip: Use the search bar at the top of the Tools panel to quickly find any tool by name or keyword.
c. The Central Panel (in the middle)
This is your main working area. It displays tool forms, results, visualizations, and documentation. Whenever you launch a tool or open a dataset, the details are shown here. You can also view the output of FROGS steps (for example, abundance tables, graphics, statistics report) directly in this area.d. The History Panel (on the right)
The History panel keeps track of all your datasets, analyses, and results. Each time you run a tool, its output appears here as a new dataset — color-coded to show its status:
Grey = waiting for server response
Orange = running
Green = finished successfully
Red = failed
Histories are automatically saved and can be renamed, shared, duplicated, or downloaded.
Tip: You can click on a dataset name to view details or click the eye icon
to preview its content.
Uploading your data
a. Importing your data into Galaxy
Before running FROGS, you need to import your input files into Galaxy. These are typically your raw sequencing reads in FASTQ format (single-end or paired-end).b. How to upload your data
In the Activity bar (left side), click “Upload”. Choose one of the following options:- Choose local file – drag and drop files or select them manually.
- Paste/Fetch data – paste a link/url to an online dataset.
Tip: Rename your datasets with clear, short names (e.g. Sample1_R1, Sample1_R2) to make them easier to identify later.
c. Important reminders
- Make sure your data correspond to the correct datatype (tar, fastq.gz, etc.).
- You can edit metadata by clicking the 🖉 (Edit attributes) icon.
The tool interface
Every Galaxy tool — including each step of the FROGS workflow — is presented through a tool form in the central panel. This interface allows you to select input data, adjust parameters, and start analyses.
A tool form is divided into several key sections:
A tool form is divided into several key sections:
- Input datasets:
You can select one or more datasets from your history as inputs.
For example, in FROGS Core Main 1.a, you choose your raw FASTQ files. - Parameters:
Below the inputs, you can configure tool-specific options such as quality thresholds, clustering methods, or reference databases.
Default parameters are already optimized for most use cases but can be adjusted if needed. - Run Tool button:
Once your inputs and parameters are set, click “Run Tool” to start the job.
The analysis will execute on the Galaxy server, and the resulting output datasets will appear in your History panel.
Running an analysis
Once your data are uploaded, you can start a FROGS analysis using the available workflow or individual tools.
Tip: If a step fails (red color), click on the dataset to read the error message by clicking on and check input compatibility or parameter settings.
If you do not understand where the error is, contact frogs-support@inrae.fr.
and check input compatibility or parameter settings.
If you do not understand where the error is, contact frogs-support@inrae.fr.
To launch FROGS tools:
- In the Tools panel, open the category FROGS (or similar, depending on your Galaxy instance).
- Click on a tool of FROGS-5 Core, FROGS-5 Stat, FROGS-5 Func, or another tool adapted to your analysis.
- In the central panel, select your input datasets (e.g. FASTQ files or abundance table).
- Adjust parameters if needed — default values are usually well suited for standard datasets.
- Click on the Run tool button.
Tip: If a step fails (red color), click on the dataset to read the error message by clicking on
and check input compatibility or parameter settings.
If you do not understand where the error is, contact frogs-support@inrae.fr.
Managing your histories
Galaxy automatically saves every operation you perform — including tool executions, parameters, and outputs — in your current history.
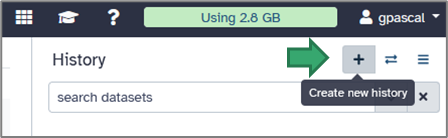
To create a new one, click on the cross icon at the top of the right panel.
You can easily switch between histories from:
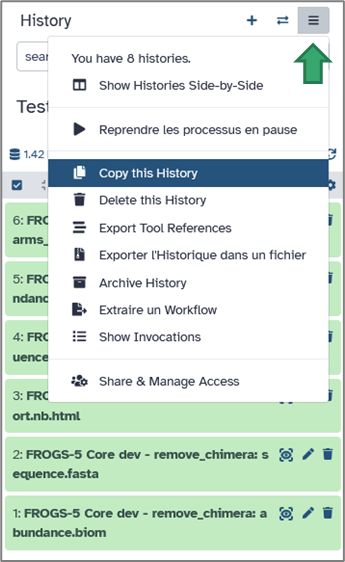
Click the history options icon → Copy History. You can then modify parameters or rerun analyses without altering the original version.
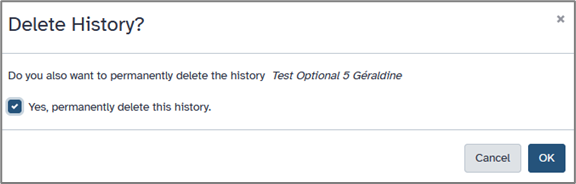
To save space, you may delete unnecessary datasets (click the trash icon), or obsolete history via history option icon.

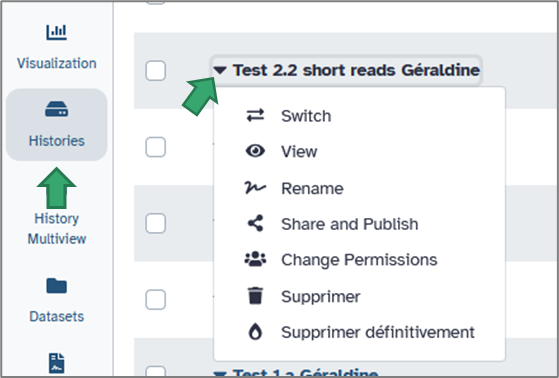
 Via the activity bar, by selecting Histories, you will have access to many useful options.
a. Creating and organizing histories
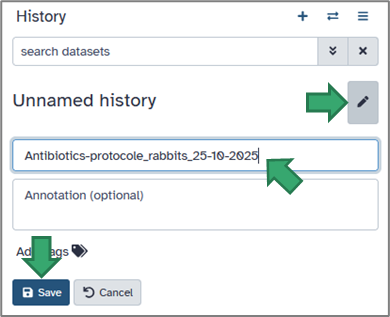
You can rename your current history by clicking on its title or on the pencil (top of the History panel).
To create a new one, click on the cross icon at the top of the right panel.
You can easily switch between histories from:
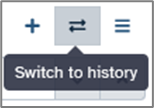
1. the double arrow on the top of the History panel
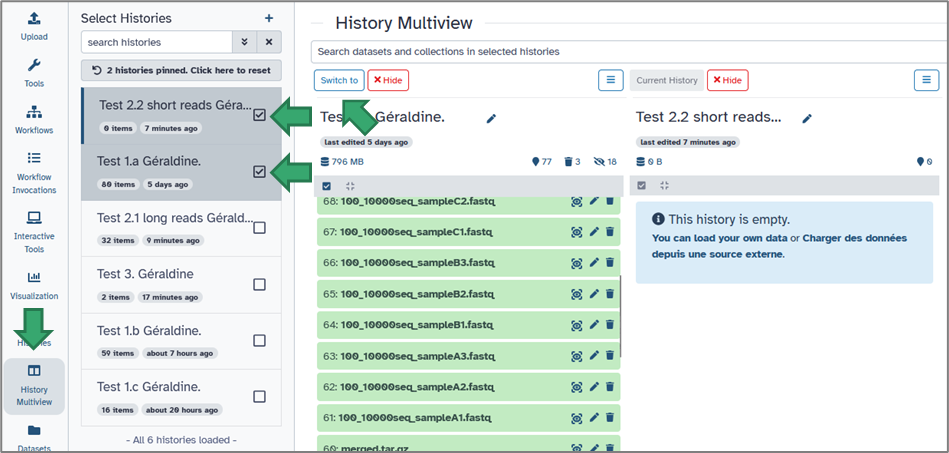
2. the activity bar. Simply select the History Multiview module.
2. the activity bar. Simply select the History Multiview module.
b. Duplicating and cleaning histories
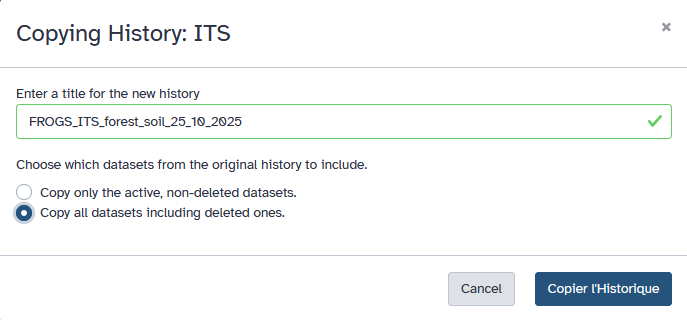
Each history can be duplicated to reuse previous analyses.
Click the history options icon → Copy History. You can then modify parameters or rerun analyses without altering the original version.
To save space, you may delete unnecessary datasets (click the trash icon), or obsolete history via history option icon.
c. Viewing and re-running tools
Clicking on a dataset allows you to:- Inspect metadata and outputs.
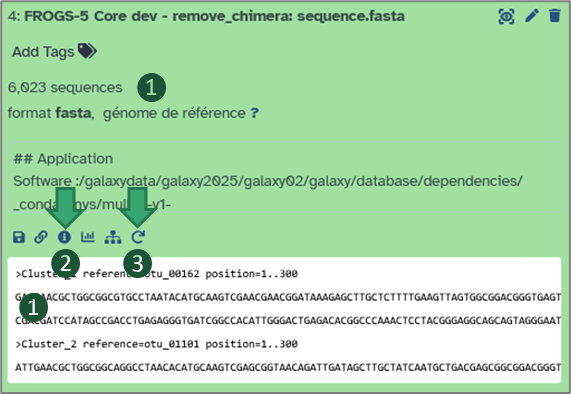
- View the tool parameters used to generate it, click on “i”.
- Re-run the same tool with identical or modified parameters using the Re-run button — ensuring complete reproducibility.
Saving, sharing, and exporting your work
a. Saving and exporting
Your histories are automatically saved on the server, but you can also export them locally:Open the History options menu → Export to file. This generates an archive (in .tar.gz) containing all datasets and workflow information, which you can download and re-import later or share with collaborators.
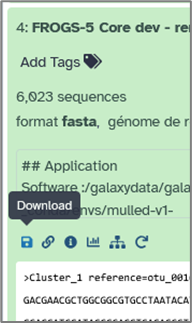
You can also export individual datasets via their specific menu → Download.
b. Sharing with collaborators
Galaxy makes it easy to share your work. From the History options, select Share & manage access.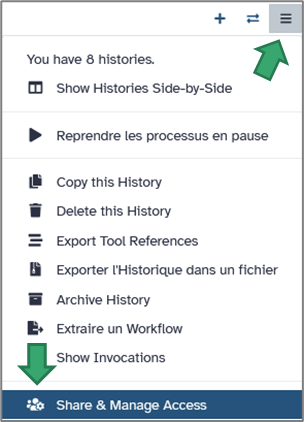
You can then:
- Generate a private link to share with specific collaborators.
- Make the history public so it’s visible to anyone on the platform.
- Share it directly with another registered Galaxy user (by username or email).

When shared, others can view, copy, or re-run your analyses — ensuring transparency and reproducibility.
c. Working with shared histories
When another Galaxy user shares a history with you, it appears under your Histories menu but is not editable. You can view all datasets, inspect parameters, and even re-run tools, but you cannot directly modify the shared version.To open a shared history: Go to the Histories module on the activity bar. Select Histories shared with me. Click on the history name to see it in your central panel.
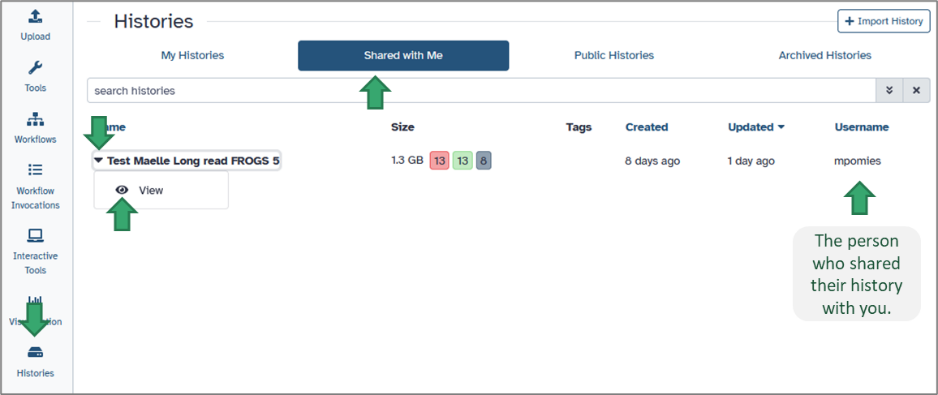
You will see all datasets and workflow steps exactly as they were produced by the owner, including tool versions, parameters, and metadata.
If you want to reuse or modify the shared analysis: Click on View the shared history and Import this history. Galaxy will create a personal copy in your own account. You can then rename it, delete or add datasets, adjust parameters, or re-run the workflow using your own data. When the owner modifies their history, you will see the history update when it is shared.

Note: Any changes you make to your copy will not affect the owner’s history. You can, in turn, share your modified copy with others using the same Share or Publish options.
Building workflows from your histories
Galaxy allows you to easily turn any sequence of analyses into a reusable workflow. This feature is especially useful after running FROGS or a set of tools that you plan to apply to multiple datasets. By creating a workflow from your history, you can re-run the same pipeline automatically — ensuring full reproducibility and saving time.
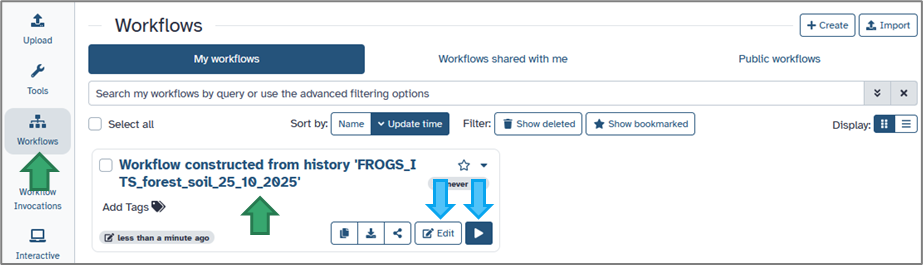
Give your workflow a clear, descriptive name (e.g. Workflow constructed from history 'FROGS_ITS_forest_soil_25_10_2025'), then click Create Workflow. Your new workflow will appear in the Workflow menu (accessible from the activity bar).

In the editor:
Tip: Double-click a tool box to adjust its default parameters — this can save you time when re-running the workflow later.
Galaxy will execute all steps automatically, following the same sequence as in your original analysis. Outputs will appear in your current history.

You can:
This is particularly useful for collaborative projects using FROGS, as all parameters, tool versions, and connections remain identical — ensuring perfect reproducibility.
a. From history to workflow
Once you’ve completed an analysis and are satisfied with the results: Open your History option (on the top of the right panel). Choose Extract Workflow. Galaxy will display a new page showing all the tools that were run in this history, in their exact order.b. Selecting the relevant steps
In the workflow extraction view: Each line corresponds to a tool execution from your history. You can select or deselect individual steps to include only those you need. (For example, you may skip data import or statistical steps if they are not required for automation.)Give your workflow a clear, descriptive name (e.g. Workflow constructed from history 'FROGS_ITS_forest_soil_25_10_2025'), then click Create Workflow. Your new workflow will appear in the Workflow menu (accessible from the activity bar).
c. Editing and customizing your workflow
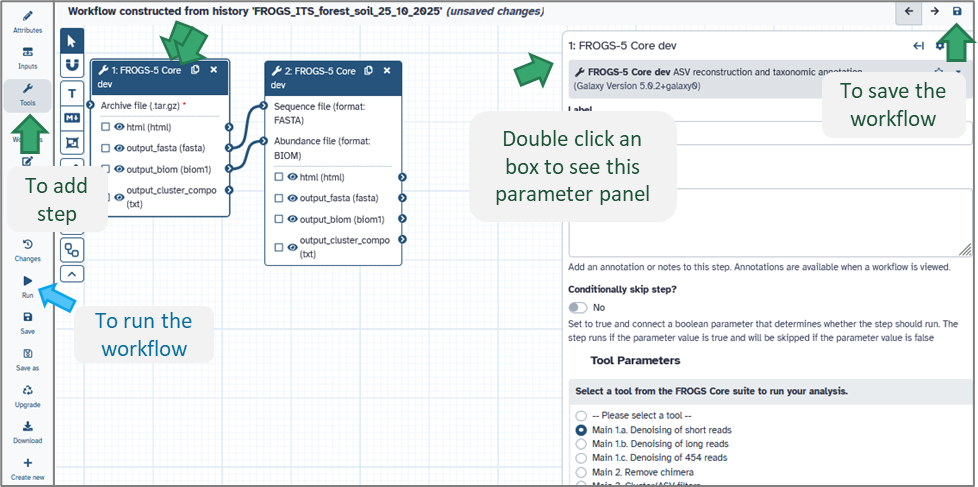
Once your workflow is created, you can modify it using Galaxy’s Workflow Editor: Open the Workflow menu (top bar). Click on your workflow name → Edit (see image above).In the editor:
- Tools are shown as boxes connected by arrows (representing data flow).
- You can drag and drop tools, change parameter defaults, or add/remove steps.
- Each connection indicates how the output of one tool becomes the input of another.
Tip: Double-click a tool box to adjust its default parameters — this can save you time when re-running the workflow later.
d. Running your workflow
To use your newly created workflow: Click Run on the activity bar next to your workflow panel. In the central panel, select your input datasets from your current history (or another — click on switch to history). Adjust parameters if necessary, then click Run Workflow (on the top of the central panel).Galaxy will execute all steps automatically, following the same sequence as in your original analysis. Outputs will appear in your current history.
e. Sharing and reusing workflows
Workflows can be shared, exported, or published just like histories: From the Workflow menu, click Share or Download.
You can:
- Share a private link with collaborators.
- Publish the workflow on your Galaxy instance for the community.
- Download it as a .ga file and import it on another Galaxy server.
This is particularly useful for collaborative projects using FROGS, as all parameters, tool versions, and connections remain identical — ensuring perfect reproducibility.
Best practices for stable analyses
- Organize your histories: Keep one history per project or dataset to avoid confusion.
- Use clear dataset names: Short, informative names (e.g. “Soil_16S_PACBIO_summer2025”) help track inputs and results.
- Avoid special characters or spaces in dataset names — use underscores _ instead.
- Regularly clean up old histories or purge deleted datasets to free storage space.
- Document your workflows: Save and name your customized workflows clearly (e.g. “FROGS_pipeline_v5_customparams”).
- Use the Re-run option rather than reconfiguring tools from scratch — it guarantees parameter consistency.